
There are two aspects, mainly, that make Minecraft a tremendously popular and addictive game. The first aspect is that it is an open and free world where you can do everything you want. In addition, it allows the installation of a huge number of mods and add-ons to enrich the experience. We are going to explain to you how you can install mods within Minecraft in the simplest way.
You should know that this game was released in 2011 and little by little it has been gaining popularity. It is currently one of the most played in the world because it allows you to do anything within the game. To give you an idea, they have created everything from libraries to bypass censorship in some countries to a simple 8-bit, 1 Hz processor.
Installing mods depends on the version of the game
There are currently two versions of this same game. We can say that on the one hand we have the classic, called Java Edition and the version for Windows. Depending on the version, in addition to the mods that we want to install, we will have to follow certain steps.
The truth is that it is much faster and easier in the Java version, which can help us test the mod a little. If we want to install it in the Windows version, then we will have to follow certain steps. We are going to give you all the detailed steps and necessary instructions.
Install mods in the Java version
We can consider this the classic version of the game, which is still quite popular. Within the game there are no differences with respect to the Windows version, although there are other changes. Above all, there are differences when it comes to installing mods, character skins and configuration. We are going to explain to you, first, how to install mods in this version of the game:
- We must open the File Browsersomething we can do easily by pressing the key Windows + E (the Windows key is the one with the company logo on our keyboard)
- Once opened, click on This teamwhich appears in the sidebar
- We now enter the disk C:
- We go down to Users and we enter this folder
- We will have to look for the folder with the name of our user and we enter inside
- If you have questions about the username, click on the Windows from the lower left corner. Now on the cogwheel Setting. In the window that opens, we enter Accounts and there the username of our team will appear in large
- Now we have to look for the AppData folder and enter it
- Inside we look for the Roaming folder and we enter
- The first folder that should appear is .Minecraftwhich is what we are looking for and which we must access
- We click on the folder resourcespack, which is where the mods are stored
- We simply have to drag the mods to this folder, without needing to do anything else
Once this process is done, we just have to open the game in the Java version. Now you must follow these steps:
- Access to Options
- Resource Packs
- We click on the one or those we want to activate
- We click on Made and the game will integrate it in an instant and it will be working
If the AppData folder does not appear
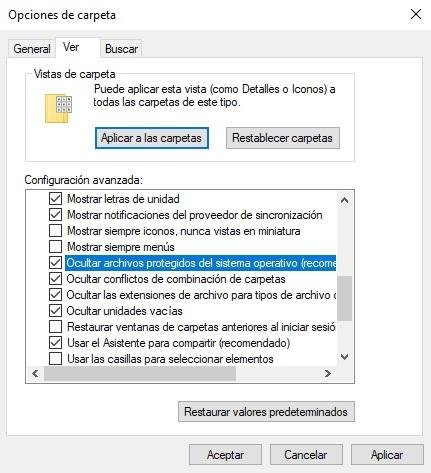
You should know that the AppData folder is normally not displayed. This is because certain critical files are stored inside and to prevent someone from messing it up, it is hidden. To show it, it is as easy as following these steps:
- In the same window of File Browser we must go to the tab Views
- Now, click on Options
- Within the window that opens, click on the tab See
- We have to search Advanced configuration the option of Hide protected operating system files and remove the selection.
- Now we give Apply. A notice will appear and we must click on Yes
Now this folder should appear.
Install mods in Minecraft for Windows
This is a slightly different process, as it “forces” you to purchase the mods and other add-ons. There is a fairly easy way to install mods without having to checkout. This is the process:
- The first thing is to download the software minecraft forge
- Now, we must install it, we simply need to click on it
- We give you Install client and then we press the Okay
- We now have to run the Forge installer again, but in this case we must click Install server
- You must open the recently created folder and double click on the file run
- The Forge server proceeds to start. You will see an error about EULA. It is as simple as searching for the eula.txt file, opening it and changing the parameter. eula=false by eula=true. You save and you can now run it without problems.
- We have to go to the AppData folder, for which we must follow these steps:
- We now enter the disk C:
- We go down to Users and we enter this folder
- We will have to look for the folder with the name of our user and we enter inside
- Now we have to look for the AppData folder and enter it
- Inside we look for the Roaming folder and we enter
- The first folder that should appear is .Minecraftwhich is what we are looking for and which we must access
- We click on the folder resourcespack, which is where the mods are stored

Where to download mods?
There are different directories from which we can download different mods for the game. We are going to suggest these:
- Curseforge– This is the best option since all of these are developed precisely for Forge
- Zonacraft– Another very good repository with a huge number of solutions available
- minecrafted: we must say that this is the one we like the most, since it has better compartmentalization by textures, maps, skins and tools